Friday, October 23, 2015

Foodie Friday: Fresh Fruit Tart


My favorite dessert by far is a fresh fruit tart. Don't get me wrong, there are days when nothing will satisfy quite like a slice of decadent chocolate cake, but I am always drawn to a delicious fresh fruit tart. From the flaky crust to the creamy pasty filling to the sweetness of the fruit, it's truly a dessert that has it all. And it has fruit- must be healthy, right? ;)

I've always been intimidated to make a fruit tart- you have to make pastry cream! As I enter my 6 month of pregnancy (and the pregnancy cravings that come with it), I haven't gotten bit by the nesting bug yet, but all I seem to want to do is bake! I seized the opportunity and went for it. Surprisingly, it was not as difficult as I thought! It takes time, but the end result is well worth it!

Fresh Fruit Tart
adapted from Ina Garten's recipe

Ingredients

Pastry Cream
- 3 large egg yolks
- 6 tbsp sugar
- 1 3/4 tbsp cornstarch
- 1 cup milk
- 1 tbsp butter, melted
- 1 tsp vanilla
- 1 tbsp heavy cream

Crust
- 1 1/4 cups flour (plus extra for rolling the crust)
- 3 tbsp sugar
- 1/2 tsp salt
- 8 tbsp (one stick) cold butter
- 3-4 tbsp ice water

Toppings
I used strawberries, raspberries, and kiwis. I would also throw in blueberries and peaches. Be sure to slice your fruit (except raspberries and blueberries) so they're easier to arrange. You can go for a patterned look like I did or group fruits in a more casual arrangement. 

You'll also need a tart pan (one where the bottom piece can be removed from the ruffly edge piece. Also needed are a piece of foil and dried beans or rice for baking the crust. 


Directions 

Pastry Cream
1. In a mixer w/ a paddle attachment, beat egg yolks and sugar on med-high for about 3 mins or until yolks are a pale yellow. On low, beat in the cornstarch. 
2. In a sauce pan, bring milk to a simmer. Slowly pour the warm milk into the egg mixture, whisking steadily on low.
3. Pour back into the sauce pan and cook over medium heat until mixture is thick. Bring to a boil, then cook on low for another 2-3 minutes.
4. Remove from heat and mix in butter, vanilla, and cream.
5. Pour into a bowl and cover with plastic wrap. Place plastic directly over the pastry cream so it does not form a film when cooling. Place in fridge until cold. It'll thicken up as it cools. 

Beating the eggs & sugar. 

Slowly adding the milk. Pour slowly as to not cook the eggs.

Cooking the pastry cream mix.

It turns more yellow as it thickens.


Crust
1. Combine flour, sugar, and salt in a bowl. Cut cold butter into small chunks and add to flour mix. Using a pastry cutter, cut in butter until well combined (only small pieces should remain). You can also do this in a food processor by pulsing ~10 times. 
2. Add ice water and mix until a dough comes together. Form dough into a disk, cover with plastic wrap, and refrigerate for 30 mins. 
3. Preheat oven to 375 degrees.
4. Removed dough from fridge and let sit for 5 mins. On a well floured surface, roll out dough until it is big enough to fit your tart tin with a little hanging over the edges. Place dough in tin and cut off excess.
5. Line crust with foil and fill with dried beans or rice. Bake for 10 mins. Remove beans and foil, prick crust with a fork, and bake for another 15-20 mins. Allow to cool completely.


I use a pastry cutter for crusts. Keep going until the flour is all incorporated.

Form into a disk, wrap with plastic wrap, and refrigerate for 30 mins. Remove and let sit for 5 mins before rolling.

You'll need a tart tin with a removable base so you can pop the crust out.


Toppings
Prepare your fruit by washing and slicing. 

Assembling the tart! 
Place tart crust on your serving plate (I don't have a plate big enough, so I just placed the crust on the round metal piece directly on the plate). Spread pastry cream over the inside of the crust. Place fruit on top either clustered together or in a pattern. 


All my ingredients ready to be assembled.

Spread the pastry cream on the crust.

Arrange the fruit and take a picture!

Enjoy!


Wednesday, October 14, 2015

Baby R: 20 weeks & It's A....

I was really hoping to post a weekly update as my pregnancy progresses, but as you can see, that clearly has not happened! A lot has happened in the past couple months- most notably, we bought a house and found out what Baby R is! I'll save the best for last though. ;)

Moving was not as bad as I was expecting. When we came back to CA from TX, we moved into a MUCH smaller apartment, so we downsized a ton. Less to pack and organize! I can breathe a huge sigh of relief now that we have a home for the baby. 

Home ownership has been an adventure. We're finding out that the little handyman tasks are not as easy as they may appear. For example, putting up that wire shelving was not as easy as we thought, but we did it! 


How far along? 20 weeks- the half way point! (*I'm playing catch up, so I'm actually 22 weeks).

Maternity clothes? Definitely in maternity tops, though some pre-pregnancy t-shirts will still work. I have maternity jeans, but I've been loving maxi skirts lately.

Sleep: I get a lot every night, but it takes me a while to get comfortable. I miss stomach sleeping.

Best moment this week: Making a delicious fruit tart. I can't decide if it's a good or bad thing that I know I can make these at home. 

Movement: Everyday! Baby tends to move more when I'm laying down. 

Food cravings: Sweets! I never had much of a sweet tooth, but this baby loves it! I try to stick to fruits, but I did cave and get some chocolate covered gummy bears. Mmm...

Anything making you queasy or sick? Thankfully the morning sickness seems to have passed, but I do get queasy if I eat too much. 
Have you started to show yet: yup!

Belly Button in or out? In and I think it may stay that way for awhile. I have a deep belly button.

Wedding rings on or off? On.

Happy or Moody most of the time: Happy.

What I miss: sleeping on my stomach. 

What I'm looking forward to: getting baby's room ready!


And of course, what you're really wondering...


We're so excited to meet this little guy!

Friday, August 28, 2015

Baby R: 1st Trimester - 14 Weeks Recap

I've been asked a lot about how the pregnancy is going so far, so I thought I'd give you all a little update.


There are some women who absolutely love being pregnant and it's a wonderful joyful experience. And then there are those who have a different experience. Not to say I don't enjoy being pregnant (I am amazed the human body can grow another person and it's pretty cool to be doing so), but there are definitely times when I have not enjoyed the side effects that come with it.

For example, morning sickness. I can really only equate my experience to having the stomach flu for 2 months straight. Things got really bad around week 10 and my doctor put me on baby-safe meds to help. Thankfully things seem to be tapering off now that I'm out of the 1st trimester. 

Fresh fruit seemed to help. I ate a lot of peaches!

Minestrone soup was also a staple.

Fatigue is pretty common in 1st Tri as well and my running/exercise in general got put on the back burner. I've noticed my lung capacity isn't what it used to be and my running pace has gotten a lot slower. I haven't even attempted going more than a couple miles at a time. I need to work on this since I've got the Disneyland 10k coming up in less than a week!


A little update on my running- at 14 weeks, I was able to get out there and make some progress! It's been slow going and I am still really nervous about not finishing the race, but at least I'm getting somewhere!


Eating has completely changed. I always assumed once pregnant, I would want to eat everything. And that was the case for the first couple weeks. Then I quickly discovered I couldn't eat as much as I used to. I used to be able to be able to eat a full prime rib dinner with mashed potatoes and veggies (mmm, now I'm getting hungry just thinking about it), but now I can barely eat 2 sliders without feeling full. But that fullness doesn't last long. You'll find me poking around the fridge a few hours later. :)


At the family 4th of July BBQ, there was a blind taste testing wine game. Sadly, I could not participate. :( 

But even harder than giving up alcohol, has been giving up sushi. Sushi is like it's own food group for me. Yes, I can still eat all the cooked stuff, but nothing satisfies quite like fresh salmon sashimi.


On more than one occasion, I have used the excuse "but baby NEEDS ice cream!" and yes, my dear husband *almost* always gives in. :) I've craved boba tea and pretty much anything that is cold. We went through a very minor heat wave here (nothing compared to the heat I experienced in Texas), but I found myself dragging the fan next to me as I lay on the couch. My body temp has definitely increased, something I was not expecting. It's been odd to say the least.

I was a bridesmaid around week 8- that pudge is mostly a good steak dinner baby. ;)


I was craving Dole Whip and my hubby found some locally! It's not quite the same without the Tiki Room atmosphere, but it hit the spot.

Life is happening fast around here and it seems like there's so much to do before baby arrives. We know we need to move out of our tiny one bedroom apartment, so we're searching for a new place to live. There's so much to research as well- car seats, strollers, carriers, cloth diapers, bottles, etc. Eeek!

If you made it this far, thanks for reading! I'll try to post updates more frequently. :) 

Friday, August 7, 2015

The Best Layered Taco Dip (Seriously)

Layered Taco Dip

I'm sure you've tasted or at least seen some kind of layered dip, but this one takes the cake. It's got extra ingredients for more flavor!
Any time there's a potluck or I host a party, I make this. It's always the first to go and people rave about it the entire time. This kind of tastiness needs to be shared. I hope you enjoy my signature dish!


Ingredients
- 1 can (10 oz) refried beans
- 1 small can diced jalapeños
- 1 box Avo Guacamole 
- 1 cup (8 oz) sour cream 
- 1 cup mayo
- 1 pkg taco seasoning 
- 1 small can (3 oz) chopped olives
- 1 small can diced chili peppers
- 6 Roma tomatoes, diced and pat dry on paper towels
- 1 bag finely shredded cheese (Mexican blend)
- tortilla chips for dipping!

- 9x13 inch dish

** You can use reduced fat alternatives (mayo, sour cream, refried beans); it'll still taste amazing!


To prep your layers- drain liquid out of cans (jalapeños, chilies, olives). If more than one ingredient in the layer, mix together before spreading.

Layers in order of going into dish (bottom to top)
Layer 1: refried beans & jalapeños
Layer 2: guacamole
Layer 3: sour cream, mayo, chilies, olives, taco seasoning
Layer 4: diced tomatoes
Layer 5: shredded cheese


Thursday, August 6, 2015

Expecting a new set of ears...

I am happy to announce that my husband and I are...


Tuesday, May 19, 2015

DIY Mickey Ice Cream Bar Ear Headband

Want Mickey ears like the ones I had for my ice cream bar costume?
I'll show you how to make them!


You'll need:
- 2 craft foam circles (I found these at Michaels in the floral section)
- a headband (fabric covered is best, not plastic)
- white felt (one sheet)
- brown felt (two sheets to be on the safe side)
- hot glue & glue gun
(I ended up not using the embroidery floss)


For each ear, shave down one of the edges so that the ear will lay flush against the headband.


Put your headband around something to mimic it being on your head. Use the hot glue to attach to the headband, centering the circles. 


Don't forget: On one ear, chisel out the bite of the ear. :)

Take the headband with attached ears and lay one ear on the brown felt. Trace around the ear, adding a 1/2 inch extra around the ear. Mark the points at the base of the ears where it meets the arc headband. Wrap the felt around to the other side of the ear and mark the points at the base of that side of the ear. Trace around that side of the ear, again adding an extra 1/2 inch around the ear. You should have something that resembles 2 circles connected by a short rectangle/square.

Repeat for the other ear, being careful to go around the bite.

Glue the brown felt to one side of the ear (you'll have that 1/2 inch hanging over the edge), then wrap the felt around the headband to the other side of the ear. That little part in the middle will ensure the ear doesn't pop off your headband. Now glue the other side of the felt to the ear. 
Now let's work on the extra around the ears. Clip the 1/2 inch of extra brown felt and glue each piece down. The round flat circles of the ears should be covered, but you should still see some foam on the curved part. 
Cut a strip of brown felt the width of the foam circle. This will go around the circumference of the circle. Glue the brown felt, paying close attention to the edges.

Repeat for the bitten ear, also cut a strip of white felt the width of the foam. Glue the white into the bite, trim excess if needed.


And you're done!

As a last minute addition, I sewed a small piece of elastic between the two ends of the headband to make the whole thing tighter. I didn't have to adjust them the entire Wine & Dine half marathon, even through the rain!

Sunday, May 17, 2015

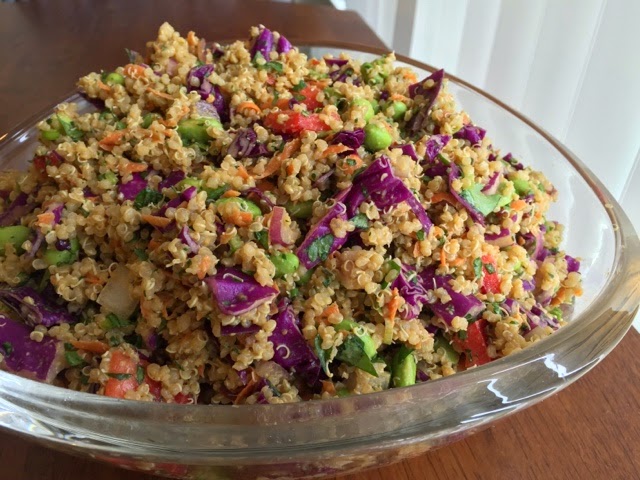
Crunchy Thai Peanut Quinoa Salad


I am always on the lookout for tasty lunch options. I love salads, but sometimes they just aren't filling enough and by the end of the work day, I'm shoving quarters as fast as I can into the break room vending machine.

I love to make this delicious Thai Crunch Salad w/ Peanut Dressing for work, but I wanted something more filling. So when I found this recipe for a Crunchy Cashew Thai Quinoa Salad w/ Ginger Peanut Dressing, I knew I had to give it a try.

I ended up using a combination of the two recipes- the dressing part of the first recipe (modified a bit) and the salad part of the second recipe. I found the dressing for the quinoa salad to have too much soy sauce and was way too salty. Plus, I already prefer the taste of the other dressing.

It's an easy salad to make; cook the quinoa, chop all the veggies, blend the dressing in a food processor, toss and voila! Yummy salad!

Crunchy Thai Peanut Quinoa Salad

Salad
1 cup uncooked quinoa
2 cups red cabbage, chopped
1 red bell pepper, chopped
1 carrot, shredded
1/2 a red onion, chopped
1/3 cup chopped green onions
1/3 cup chopped cilantro leaves
1/2 cup cashews or peanuts
1/2 cup edamame, shelled and cooked

Dressing* 
1/3 cup peanut butter
1 tbsp red wine vinegar (or unseasoned rice vinegar)
2 tbsp fresh lime juice
2 tbsp olive oil
2 tbsp soy sauce
2 tbsp honey
1/2" square ginger, chopped
1 clove of garlic
1/2 tsp salt
3 tbsp cilantro leaves
1 tsp sesame oil (optional)
1/2 tsp red chili pepper flakes (optional)

* When making the dressing, don't forget to taste test and tweak it to your personal preferences. I rarely follow the recipe to a T, I add a bit more here and there until I like the flavor. I enjoy spicy, so I add more chili flakes! :)


Directions

Cook the quinoa first. Bring 2 cups of water to a boil, add quinoa, cover and simmer for 15 minutes or until all water is gone.


While the quinoa cooks and cools, chop and prep all your veggies. If you need to, cook the edamame.


I love the vibrant colors of the salad!
Red onions, carrots, red cabbage, red bell pepper, green onions, and cilantro.

Let's make the dressing!
Throw all the ingredients into a food processor and blend. Add move olive oil if it's too thick. Don't thin it out too much; it should be the consistency of a sauce.


After letting the quinoa cool, mix all the ingredients together. Don't add the dressing all at once. Add a little at a time as the dressing can definitely overpower the salad. I found that I did not use all the dressing I had made.

Since I'll be taking leftovers to work, I didn't add the cashews yet. I'll add those the day of.

Enjoy!